How to Draw Cinderella (Full Body)
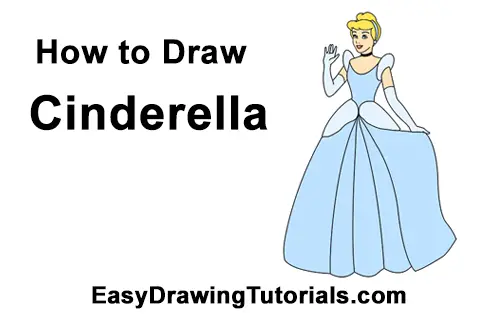
Use the videos and step-by-step drawing instructions below to learn how to draw Cinderella (Full Body). A new cartoon drawing tutorial is uploaded every week, so stay tooned!
The speed drawing video:
The written step-by-step video tutorial:
Intro: Start off with a pencil sketch. In the beginning stages, don’t press down too hard. Use light, smooth strokes for sketching.

Step 1: Draw a small circle near the top of the page as a guide for Cinderella's head. First draw four tiny marks for the height and width of the circle, then connect the marks using curved lines. Sketch lightly at first so that it's easy to erase if you make a mistake. But the circle doesn't have to be perfect. It's just a guide. If you do want a perfect circle, trace the outer rim of a coin, bottle cap or anything else that's circular.

Step 2: Draw a small V-shaped line under the head as a guide for the jaw and chin. Don't draw this line too low, otherwise your Cinderella will end up with a big chin.
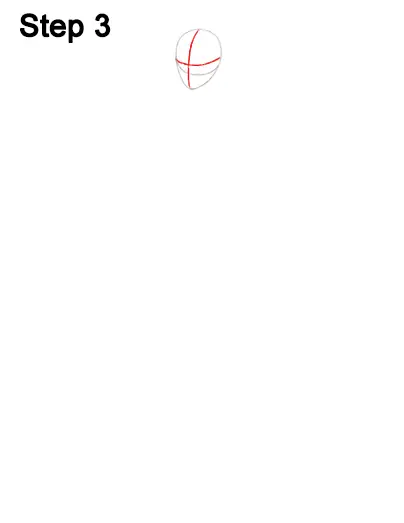
Step 3: Draw two intersecting lines inside the head, one horizontal and one vertical. Curve the lines to contour to the head. These construction lines will help you place Cinderella's facial features later.
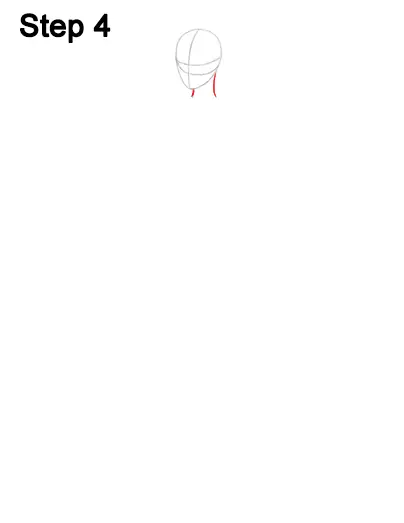
Step 4: Draw two short lines under the head as guides for Cinderella's neck.
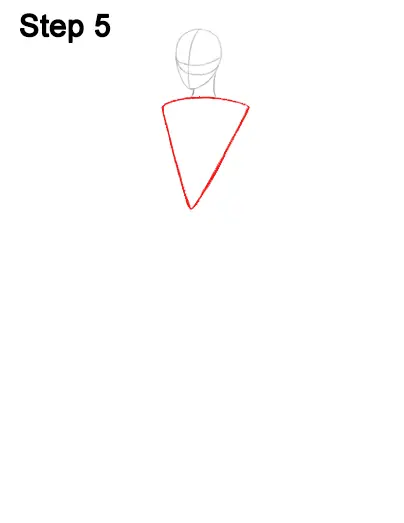
Step 5: Draw a triangle under Cinderella's head as a guide for the torso. First draw a horizontal line under the neck. Then draw a big V-shaped line underneath to complete the guide. Pay attention to the size of the triangle in relation to the head. Sketch lightly at first, then darken the lines when you get the size right.
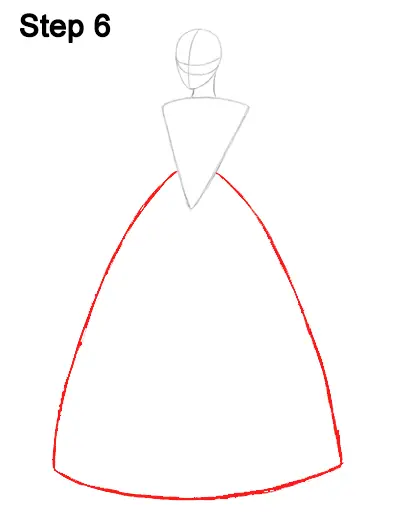
Step 6: Draw three long curved lines under the torso as guides for Cinderella's dress. Sketch the line on the left first. When you get the length right in relation to the rest of the body, darken the line. Now draw a similar line on the right side. This line should be the same length as the one on the left. Notice where the lines start at the top. They're near the bottom of the triangle but not all the way at the bottom. Add a curved horizontal line at the bottom to connect the vertical lines. The end result should be similar to a bell.
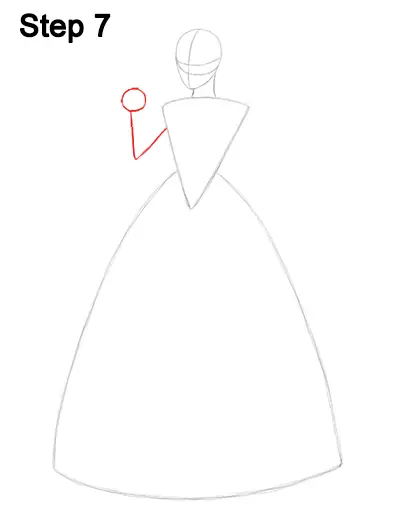
Step 7: On the top, left side of Cinderella's torso, draw a small V-shaped line as a guide for the first arm. On the end of the line, draw a small circle as a guide for the hand.
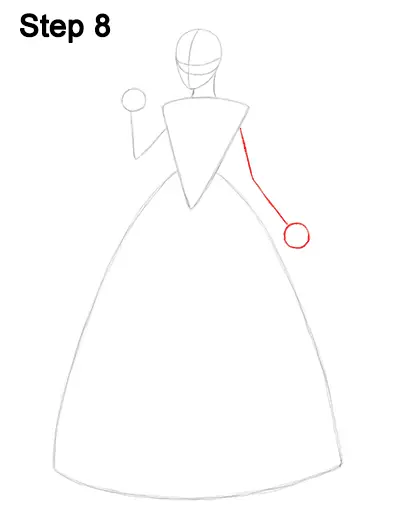
Step 8: On the top, right side of the torso, draw a line that bends outward to the right a bit as a guide for the other arm. Draw a small circle at the end of that line too as a guide for Cinderella's other hand.
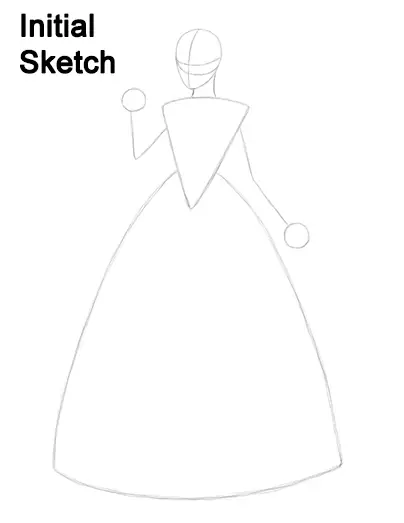
That's it for the guides! For the next steps, use darker lines for a more finished drawing.
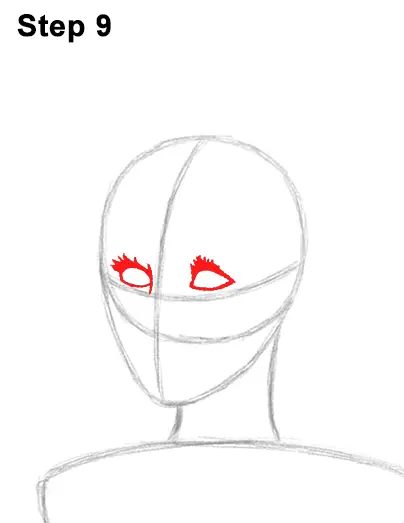
Step 9: Lightly sketch the shapes of Cinderella's eyes on top of the horizontal construction line and on either side of the vertical construction line. The shapes of the eyes should be similar to half-circles. Draw a small curved line on the right edge of the eye on the left for the bridge of the nose. When you get the placement and shapes of the eyes right, darken the lines.
Sketch the shapes lightly at first so that they're easy to erase if you make a mistake. On top of each eye, draw thick, dark eyelashes. The eyelashes are made up of dark, triangle-like, curved spikes. Cinderella has long, thick eyelashes, so don't draw them to short.
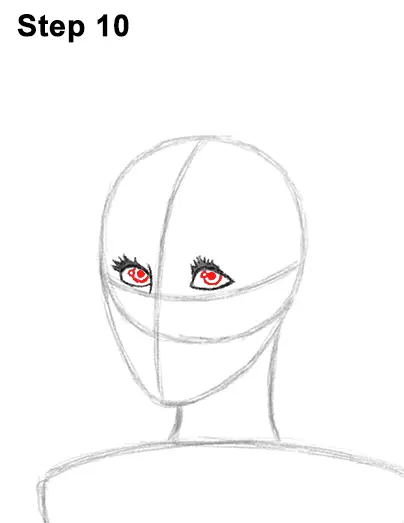
Step 10: Inside each eye, near the right side, draw a very small circle for the irises. On the side of each iris, draw an even smaller circle to represent glare. In the middle of each iris, draw a tiny dot for Cinderella's pupils.
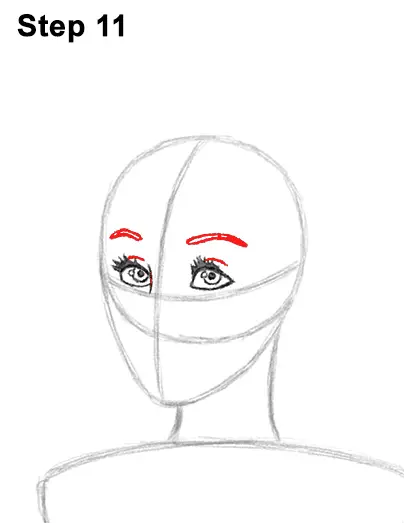
Step 11: Draw a thick curved line, high above each eye for Cinderella's eyebrows. Each eyebrow is actually composed of two curved lines on top of each other to create thickness. The eyebrow on the right should be slightly longer than the one on the left because of the perspective. Right on top of each eye, draw a smaller curved line for the eyelids.
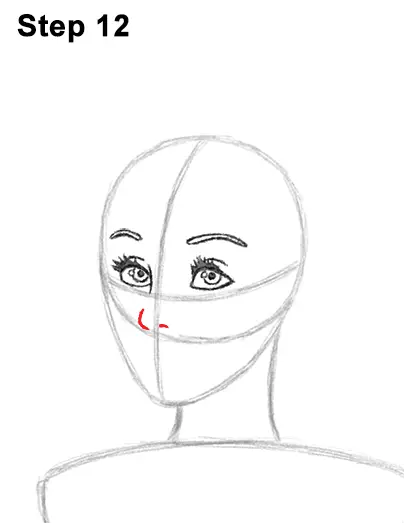
Step 12: Draw a small curved line for the tip of Cinderella's nose. Place it near the bottom edge of the initial circle and to the left of the vertical construction line. Add an even smaller curved line on the right for the nostril.
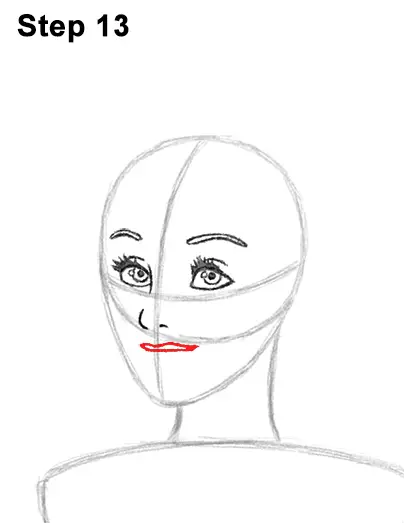
Step 13: Draw a long, thin shape right outside the bottom edge of the initial circle for the top lip. Cinderella's lip should be thick in the middle, and the edges on either side should be thin and pointy.
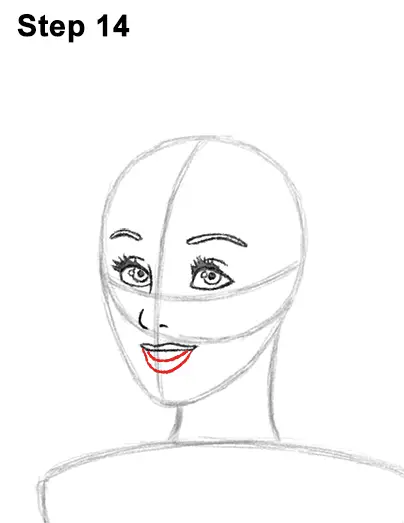
Step 14: Draw a small U-shaped arc under the top lip to indicate the open mouth. Draw a bigger arc underneath it for Cinderella's bottom lip.
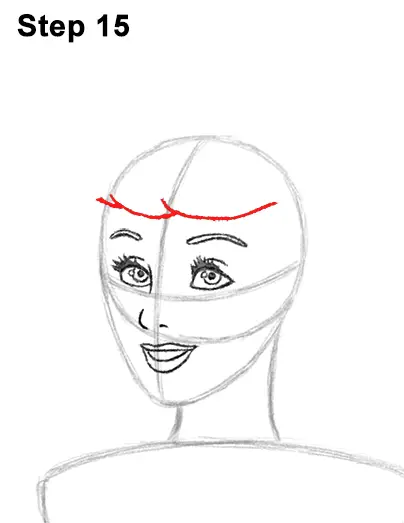
Step 15: Draw the front part of Cinderella's hair by first drawing a long, curved line on the top right side of the head. Now draw a smaller curved line to the left of it. To the left of that line, draw an even smaller curved line.
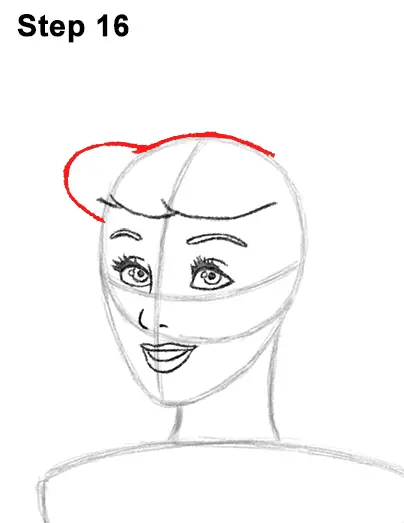
Step 16: Follow the curvature of the initial circle to draw a line above the head for the top part of Cinderella's hair. To the left, draw a C-shaped line for the top, left side of the hair.
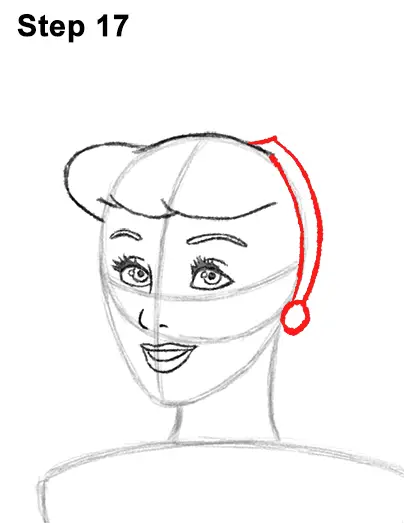
Step 17: Darken the right side of the intial circle and draw a small circle at the bottom for part of the headband. Add another curved line to the right to finish up the shape of Cinderella's headband.
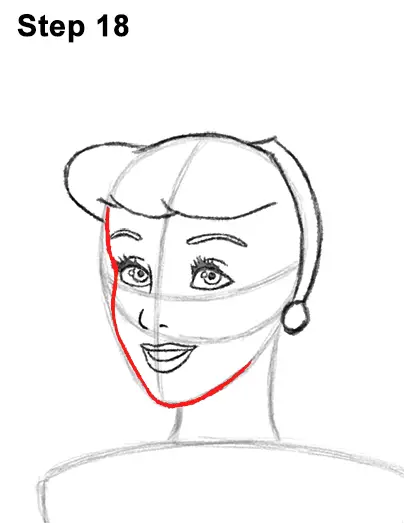
Step 18: Follow the basic path of the guides to create the shape of Cinderella's face. The line for the face should come inward a bit near the eye to create the cheekbone. Make the bottom part of the arc rounder so that the chin isn't too pointy.
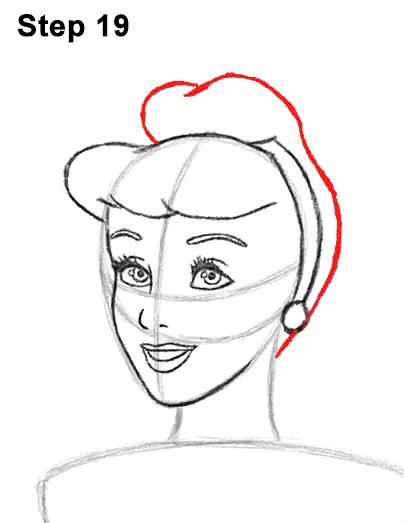
Step 19: Draw the back portion of the hair by first drawing a curved line high above the head for the bun. Continue drawing that same line down to the right side of the head so that it ends to the right of the neck. Now draw a C- shaped line above the head for the left side of Cinderella's bun.
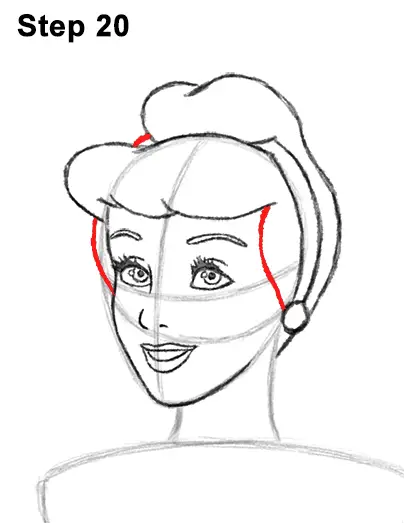
Step 20: Draw a curved line to the right of Cinderella's eyes for the side of the hair. Draw a small curved line on the top, left side of the hair and a longer line to the left of the eyes for more hair.
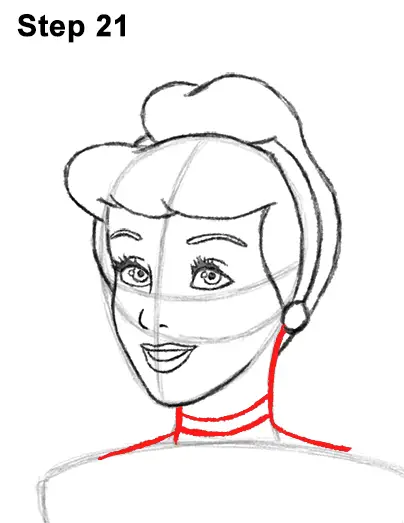
Step 21: Darken the lines under the head to create the neck. Inside the neck, draw two curved horizontal lines for Cinderella's choker.
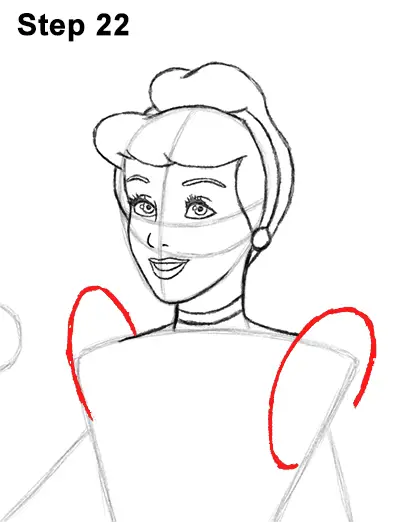
Step 22: Draw a curved line on the top, left side of the initial triangle shape for the puffy shoulder on Cinderella's dress. The shape should be similar to the top part of an oval. Now draw an oval- like shape on the top right side of the initial trangle for the other puffy shoulder. Sketch lightly at first. When you get the shape and placement right, darken the line.
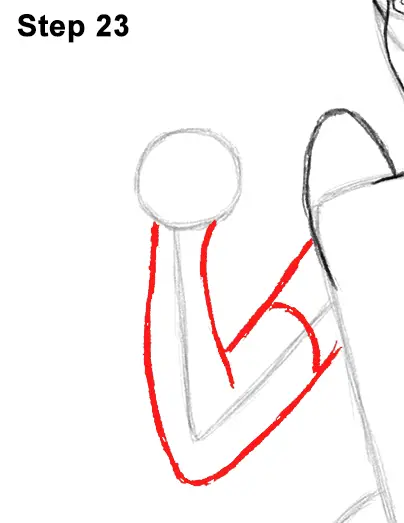
Step 23: Use the V- shaped line on the left side of the body as a guide to draw Cinderella's arm. Sketch the forearm lightly as you follow the basic path of the guide. The top should be thinner than the bottom. Add the top part of the arm as two diagonal lines that are parallel to each other. Once you get the shape of the arm right, darken the lines. Draw a short, curved line inside the arm, near the top, for the long glove.
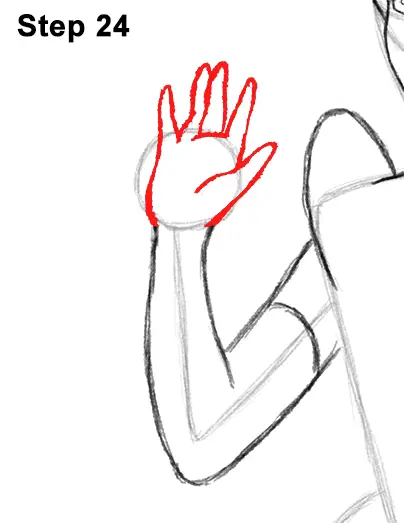
Step 24: Use the small circle as a basic guide to draw Cinderella's hand and fingers. First draw a long thin arc on the right side of the circle for the thumb. Darken the left side of the initial circle to create the other side of the hand. Sketch a longer, thin arc on the top, right side of the initial circle for the index finger. The top part of the finger should be thinner than the bottom. When you get the shape right, darken the line.
The middle finger should be a thin arc that's a tiny bit longer than the index finger. The ring finger should be right up against the middle finger. For variety, the fingers aren't spaced out evenly. The pinky should be on the upper, left side of the initial circle and should be the thinnest and shortest finger.
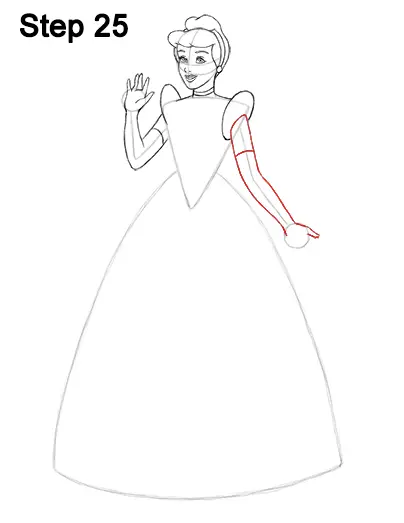
Step 25: Use the line on the right side of the torso as a guide to draw Cinderella's other arm. Sketch lightly at first as you follow the basic path of the guide and create the shape of the arm. The arm should be thin near the middle to create the elbow joint. It should also be thin near the bottom for the wrist. The lower edge of the arm should almost touch the bottom part of the dress.
When you get the shape of the arm right, darken the lines. The fingers will be behind the dress, so only draw Cinderella's thumb as a small, thin arc on the top part of the initial circle. Add a small, curved line inside the arm, near the top, for the glove.
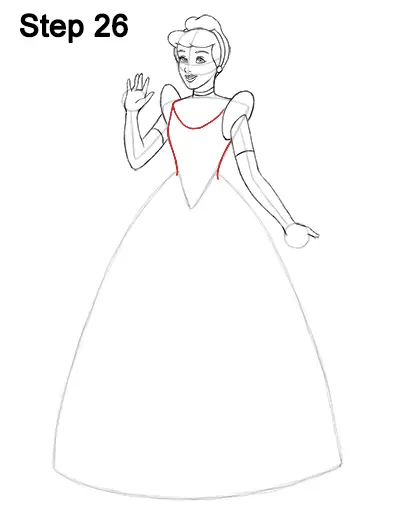
Step 26: Use the initial triangle shape as a guide to draw Cinderella's torso. Darken the outer edges of the triangle to create the sides of the body. Draw a curved line from one shoulder to the other to create the top part of the dress. Don't draw this curved line too low on the torso.
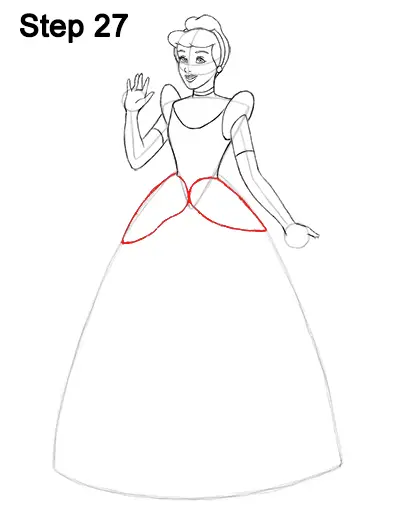
Step 27: Draw the two puffy sections of Cinderella's dress right under the torso. These shapes are curvy at the top and then end at a pointy tip on the sides of the dress. The top curved sections of the shapes should come together right on the tip of the initial triangle guide. The shape on the right should be a bit smaller because she will be pulling on the dress.
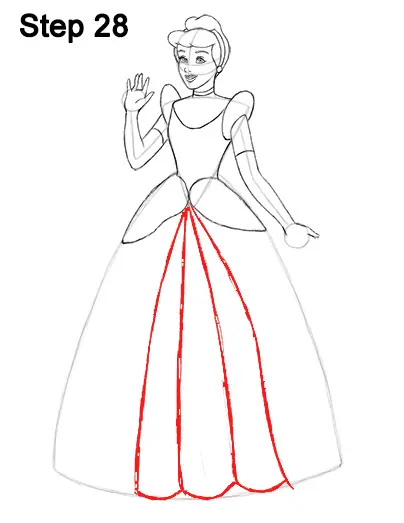
Step 28: Draw four lines across the middle of the dress to emphasize the design. Start with the two outer lines first. Sketch lightly to determine the position of the lines. The line on the right should bend a bit near the middle because Cinderella is pulling on the dress. Now add the two lines in the middle. The lines should all come from the same point at the top and get wider at the bottom. Space the lines pretty evenly. Add a series of curved lines at the bottom for the lower edge of the dress.
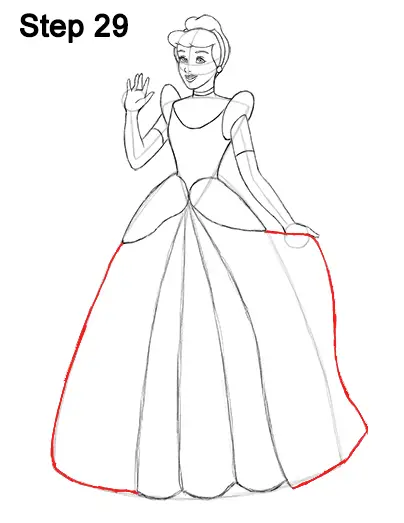
Step 29: Darken the line on the left side to create the side of the dress. For the right side of the dress, draw a line that goes over the initial circle to cover Cinderella's hand, so only the thumb shows. Then curve the line down and join it to the initial guide to finish the shape of the dress.
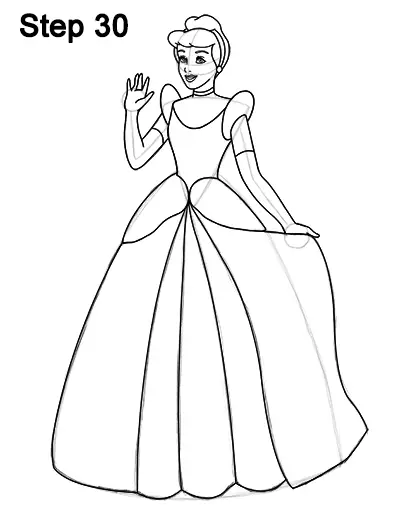
Step 30: For a more finished look, carefully go over the final sketch lines with a pen or marker.
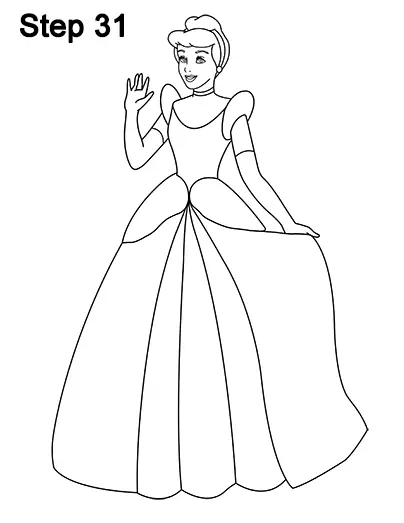
Step 31: After inking, get rid of every pencil mark with an eraser for a cleaner drawing.
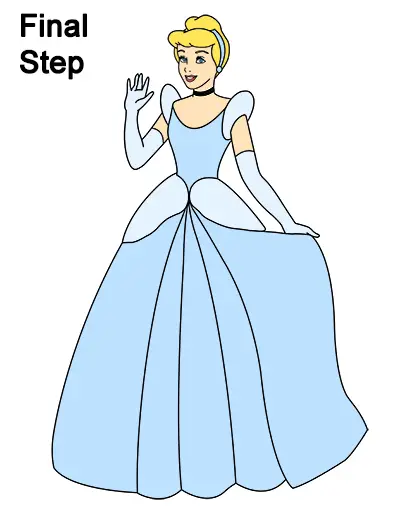
Final Step: Color your Cinderella drawing using color pencils, markers or even crayons! First color the hair yellow and the eyebrows light brown. Use peach for the skin. If you don't have peach, improvise and use yellow-orange or light brown. Color the lips red or pink and the choker black. Use light blue for the puffy shoulders, the gloves and the puffy portions below her waist. As you color these sections, don't push down too hard on your pencil. These sections are very light blue. Color Cinderella's headband, the eyes and the rest of the dress light blue too but this time push down harder with your pencil.
Thanks for visiting! Subscribe to the EasyDrawingTutorials YouTube Channel for a new tutorial every Sunday.
To learn how to draw animals, visit How2DrawAnimals.com.
RELATED TUTORIALS
 |
 |
 |
 |
 |


