How to Draw Fear (Inside Out)
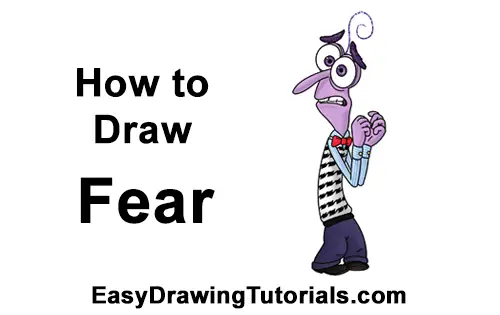
Use the video and step-by-step drawing instructions below to learn how to draw Fear from Disney•Pixar's Inside Out. A new cartoon drawing tutorial is uploaded every week, so stay tooned!
Intro: Start off with a pencil sketch. In the beginning stages, don’t press down too hard. Use light, smooth strokes for sketching.
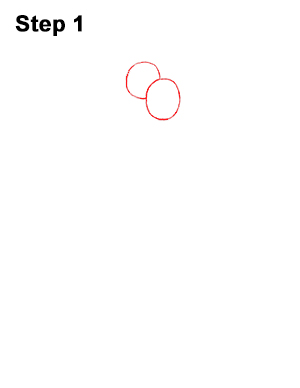
Step 1: Start by drawing two small ovals overlapping each other as guides for Fear's eyeballs. These ovals should be close to the top of the page. Leave enough room at the bottom for the rest of the body. The oval in the back should be above and to the left of the first oval. It's okay if they're not perfect, as long as they look more or less like the image above.
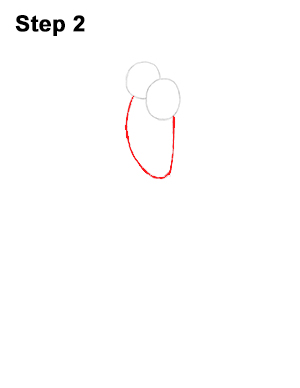
Step 2: Under the eyes, draw a curved line similar to the letter U as a guide for the lower half of Fear's head. Notice that the line bulges out a little on the left side.
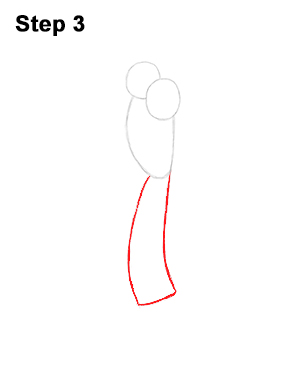
Step 3: Under the head, draw a shape similar to a long rectangle as a guide for Fear's body. The shape basically consists of two lines that curve to the right a bit and a shorter line at the bottom that connects them.
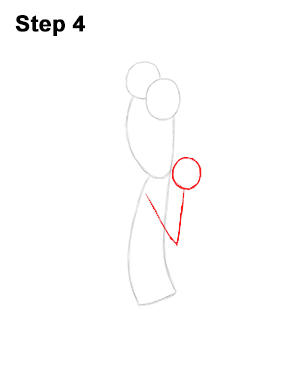
Step 4: Draw an angled line similar to the letter V near the top part of Fear's body as a guide for the left arm. The line starts inside the body but comes out of it. At the end of the line, draw a small circle as a guide for Fear's hand.
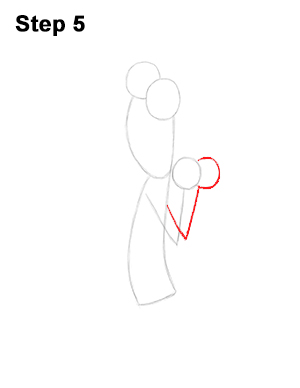
Step 5: Add another line and circle similar to the one in the previous step as a guide for Fear's other arm and hand. Most of this arm will be blocked by the body and the first arm, so only draw the visible parts of the guide. Try not to overlap the guides.
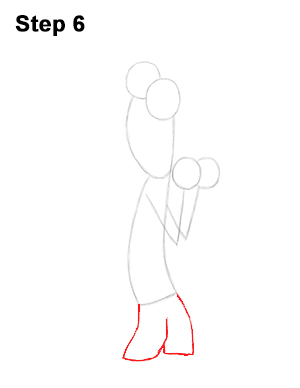
Step 6: Under the body, draw an angled line that's kind of similar to the letter W as a guide for Fear's pants. The line should bend on the sides near the middle to indicate the knee joints. There should be two flat edges on the bottom that represent the bottom part of the pants.
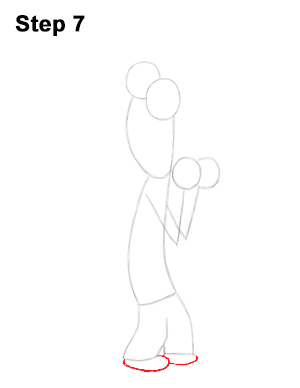
Step 7: Draw two curved lines similar to flat ovals under the pants as guides for Fear's feet. The oval on the left should be blocking a bit of the oval on the right.
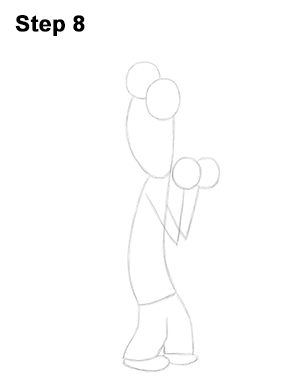
Step 8: That’s it for the initial sketch! You have the basic shape of Fear from Disney•Pixar's Inside Out. Now go in and tighten your drawing. From this point on, press harder with your pencil in order to get darker lines and a more defined sketch.
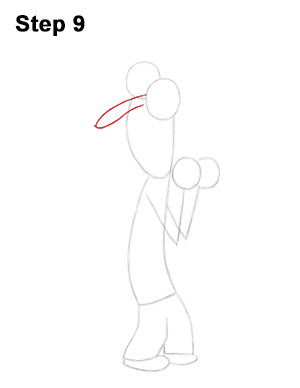
Step 9: Draw a long, thin curved arc in between the eyes for Fear's nose. The base of the nose should start on the lower edge of the eye on the left.
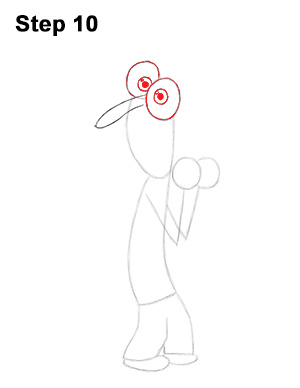
Step 10: Darken the initial shapes of Fear's eyes using thicker lines. Inside each eye, draw a small circle for Fear's irises. Inside each iris, draw a dot in the middle for the pupils and a tiny circle off to the side to represent glare.
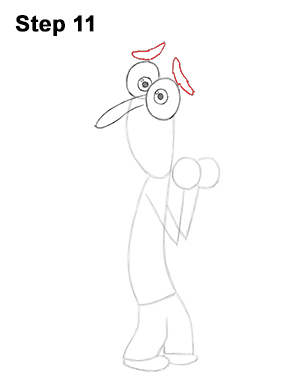
Step 11: Above the eyes, draw a thick, curved shape for Fear's eyebrows. The eyebrows should tilt down toward the outside to give him a worried look.
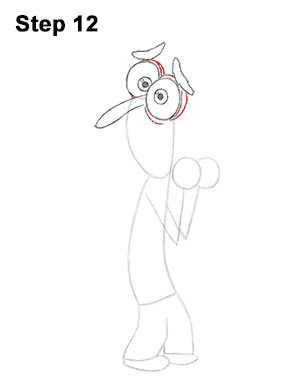
Step 12: Add a few curved lines on the right side of the eyeballs and behind the eyebrows for the back portion of Fear's eyes and the eyelids.
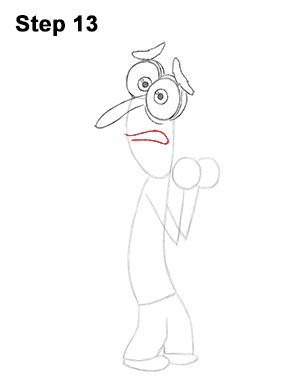
Step 13: Near the middle of the face, draw a wavy arc that is open on the left side for Fear's mouth. The arc should curve down a bit on the right side for a fearful look.
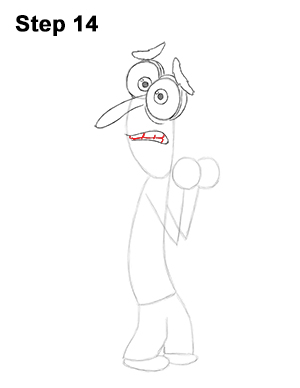
Step 14: Inside the shape of the mouth, draw a series of square-like lines for Fear's teeth. Don't draw each individual tooth. Just draw a few of the edges to give the impression of teeth.
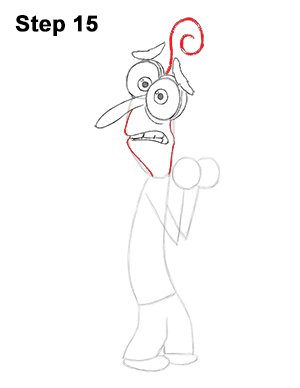
Step 15: Use the initial shape under the eyes as a guide to draw the rest of Fear's face. Make the shape of the face a bit thinner using wavy lines. On top of the head and between the eyes, draw a spiral line for the single strand of hair on his head.
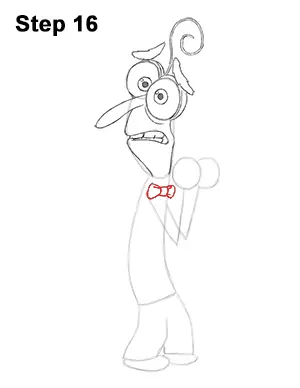
Step 16: Under the head, draw Fear's bow tie using a series of curved lines. Don't draw the bow tie too big. It should almost fit between the lines for the arms.
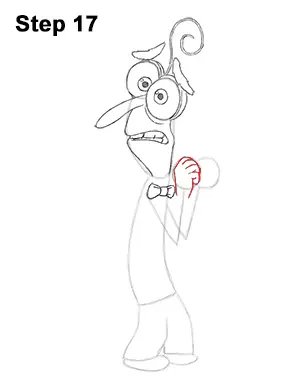
Step 17: Use the initial circle as a guide to draw Fear's hand that's on this side. Draw the top of the knuckles using a few curved lines. The bottom part of the hand should stick outside of the initial circle.
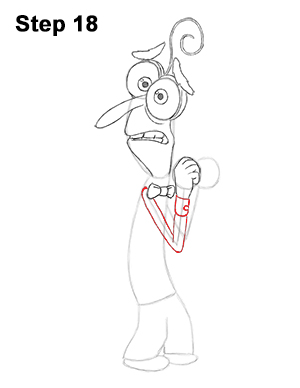
Step 18: Now use the initial line as a guide to draw Fear's arm. Follow the path of the guide as you make the shape of the arm thicker. Add the shirt's cuff and button near the top, close to the hand.
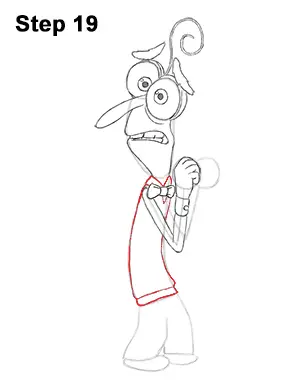
Step 19: Use the initial rectangle-like shape as a guide to draw Fear's torso. Darken the lines on the side. Add a V-shaped line for the collar at the top and and extra line at the bottom for the lower edge of his vest.
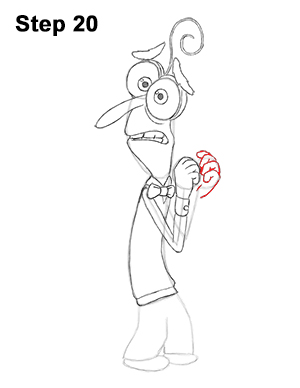
Step 20: Draw Fear's other hand using the initial circle as a guide. This hand has the fingers folded toward the viewer, so draw them using a series of curved lines within the initial circle. The bottom part of the hand should stick outside of the lower edge of the circle. Use the image above for further reference.
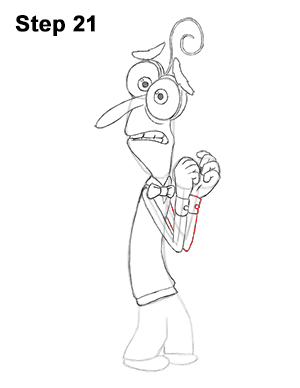
Step 21: Now add Fear's other arm using the initial line as a guide. Most of the arm is hidden by the arm you just drew, so be sure that the lines don't overlap.
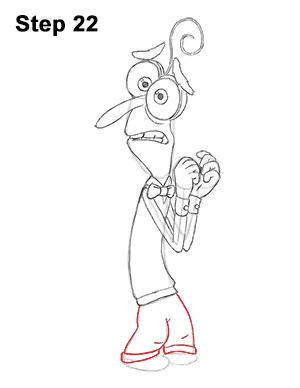
Step 22: Darken the lines of the initial W-like shape to create Fear's pants. Add an extra line at the bottom for the pants' folded cuff and a small line near the middle, where the knees are, for creases.
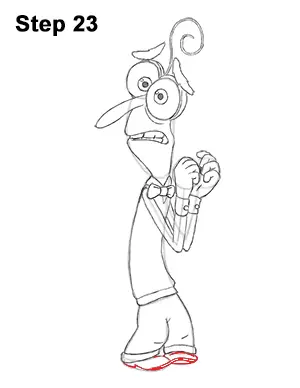
Step 23: Draw Fear's shoes using the initial ovals as guides. The shape of the shoes should fit within the shape of the ovals. Draw the heel of the shoe on the left only. Because of the perspective, the heel of the shoe on the right is not visible.
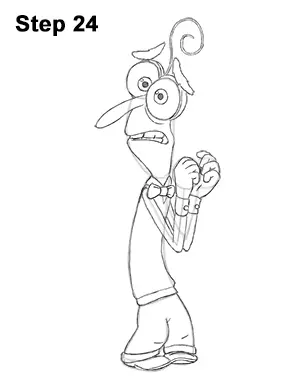
Step 24: That’s it! You now have a nice sketch of Fear from Disney•Pixar's Inside Out. You can stop at this quick drawing for a rough, sketchy look or go for a more finished look by continuing to the next step.
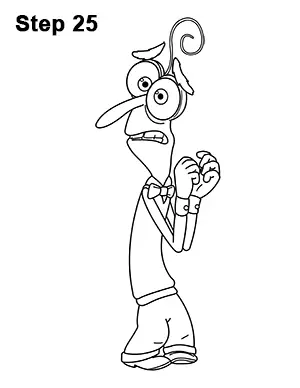
Step 25: For a more finished, inked look, carefully draw over the final sketch lines with a pen or marker. Wait for the ink to dry, and then get rid of every pencil mark with an eraser. You now have a finished inked drawing of Fear! You can stop here or go to the final step to complete your Fear drawing.
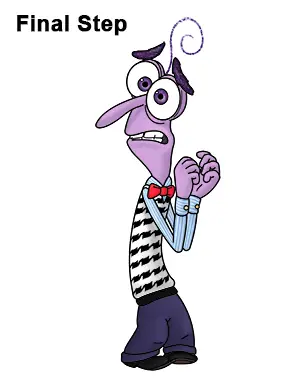
Final Step: For a completely finished Fear drawing, you have to color it. You can use markers, color pencils or even crayons! Fear's skin is purple. His eyebrows, pupils and hair are dark purple. His bow tie is red, and his shirt has thin, blue stripes. His vest has a pattern that's similar to a bunch of diamonds that are connected by a line on the sides. His pants are dark blue, and his shoes are black. That’s it! You now have a completed drawing of Fear from Disney•Pixar's Inside Out.
Thanks for visiting! Subscribe to the EasyDrawingTutorials YouTube Channel for a new tutorial every Sunday.
To learn how to draw animals, visit How2DrawAnimals.com.
RELATED TUTORIALS
 |
 |
 |
 |


