How to Draw Donkey Kong
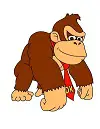
Use the video and step-by-step drawing instructions below to learn how to draw Nintendo's Donkey Kong. A new cartoon drawing tutorial is uploaded every week, so stay tooned!
Intro: Start drawing Nintendo's Donkey Kong with a pencil sketch. In the beginning stages, don't press down too hard. Use light, smooth strokes for sketching.
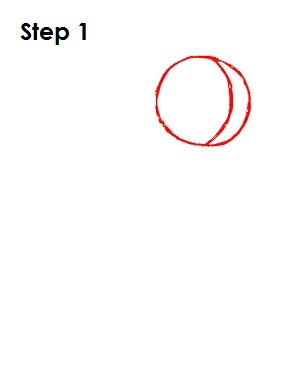
Step 1: To draw Donkey Kong, start with a circle on the top right part of the paper. Inside the circle, draw a curved vertical line on the right side that contours to the shape of the circle. You don't have to draw the circle perfectly. It's just a basic shape for Donkey Kong's head.
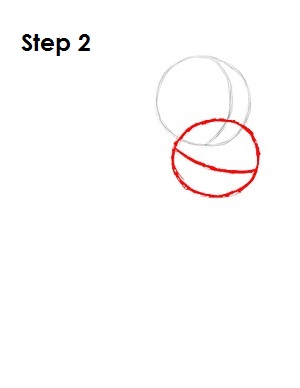
Step 2: Below the first circle, draw a slightly smaller circle and draw a line inside as well. This time, make the line horizontal and draw it more toward the bottom. Don't forget to bend the line to contour the circle. This is the basic shape for Donkey Kong's mouth.
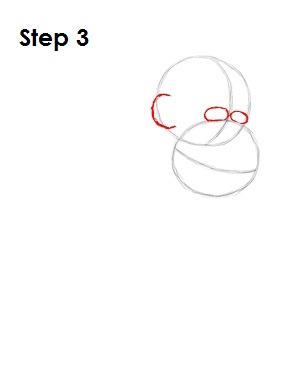
Step 3: Sketch in Donkey Kong's eyes by drawing two small ovals on top of the lower circle. Draw them on either side of the top circle's vertical line. The right oval should be smaller because of the perspective. For Donkey Kong's ear, draw an arc to the left of the bigger circle that is similar to the letter C. Draw it so the bottom of the C shape is a little below the level of the eyes.
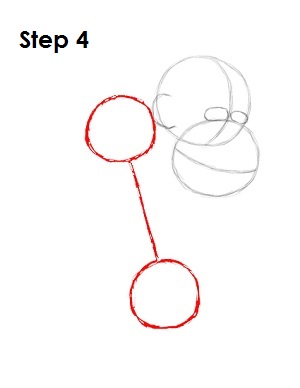
Step 4: Draw a circle smaller than Donkey Kong's head right next to his ear and a diagonal line underneath it. At the end of the diagonal line, draw a circle similar in size to the top one. This will be the left arm of this video game character.
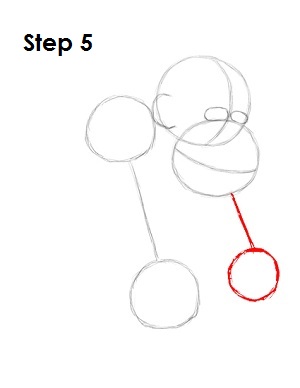
Step 5: From the bottom of Donkey Kong's mouth, draw another diagonal line almost parallel to the first and another circle at the end of it. This is a guide for the right arm.
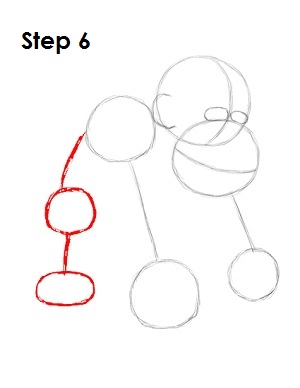
Step 6: On the left side of the top circle of the left arm, draw a curved line for Donkey Kong's back. At the end of this line, draw a smaller circle for the top part of his leg. Below the circle draw a vertical line with an oval under it as a guide for Donkey Kong's foot.
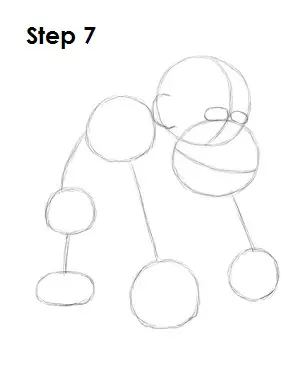
Step 7: That's it for the initial sketch of Nintendo's Donkey Kong! You have the basic Donkey Kong shape, so now go in and tighten your drawing. From this point on, press harder with your pencil in order to get darker lines and a more defined sketch.
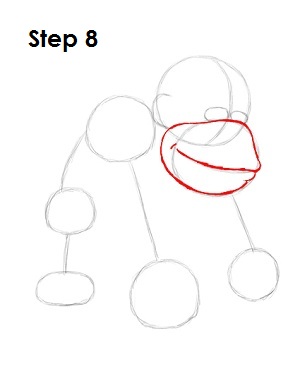
Step 8: Draw Donkey Kong's mouth by stretching out the left side to make his muzzle wider. Use the horizontal line to create his mouth. On the right, create his lips by drawing two small bumps.
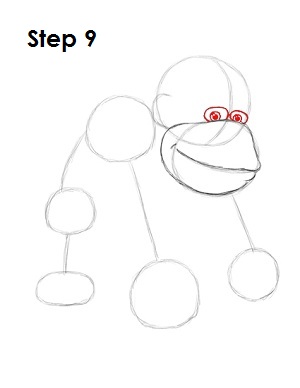
Step 9: Darken in the shape of Donkey Kong's eyes. Inside each eye, draw a series of circles; a big one for his iris, a smaller shaded one for his pupil and an even smaller one for glare.
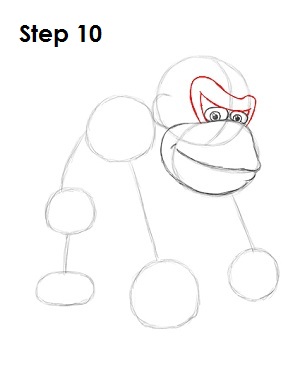
Step 10: Above Donkey Kong's eyes draw his brow. It looks like a fat, wide letter M that wraps around both of his eyes. Make it smaller on the right side because of the perspective.
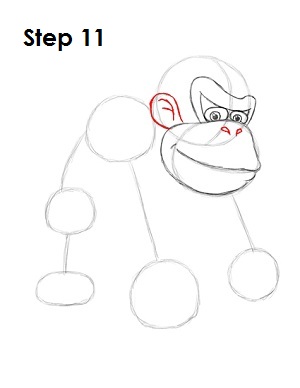
Step 11: Draw the rest of Donkey Kong's ear and attach it to the upper left portion of his muzzle. Add a few lines inside the shape as the structure of the inner ear. Draw his nostrils below his eyes using the main circle and its vertical line as guides for the placement. The nostrils of this video game character look like upside-down water drops.
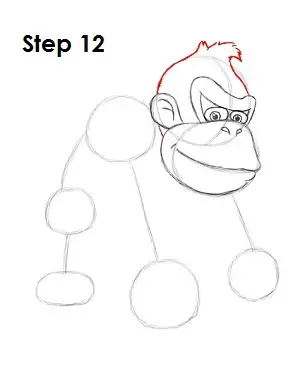
Step 12: Use the top circle as a guide for drawing Donkey Kong's head. At the top of his head, draw a series of curved lines to indicate his tuft of hair.
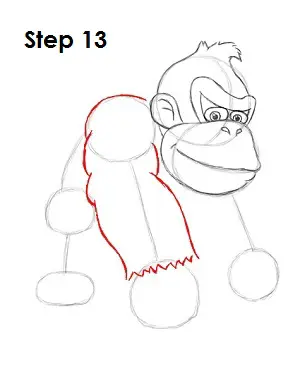
Step 13: Darken the top part of the circle next to Donkey Kong's ear to create his shoulder. Then, using a series of curved lines that go around the diagonal line, draw in the rest of his arm. Draw some zigzag lines under it to represent where Donkey Kong's fur ends.
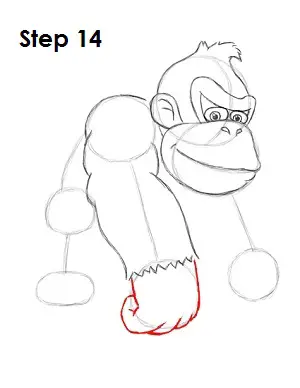
Step 14: Using the circle as a guide, draw in Donkey Kong's hand with his fingers pointing back. Draw curves on the bottom to indicate his knuckles and the pinky curling back.
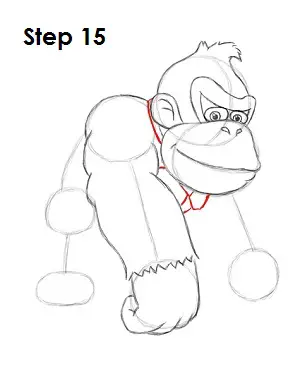
Step 15: Next to Donkey Kong's ear, draw a line for the tie around his neck. Under his chin, draw a few more lines to represent the knot, and to the left of that a couple of curved lines create his chest.
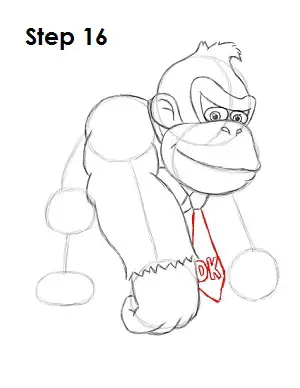
Step 16: Under the knot, draw a diamond-like shape similar to a kite. On the inside of that shape, draw the letters D and K in bold for Donkey Kong's classic tie.
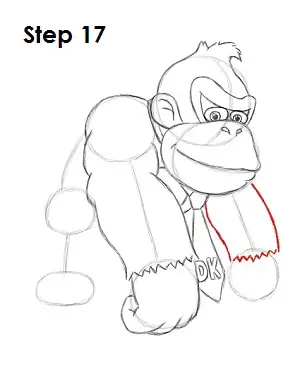
Step 17: Draw the right arm like the left by drawing a couple of curves around the guide line and W-looking zigzags at the bottom for Donkey Kong's fur.
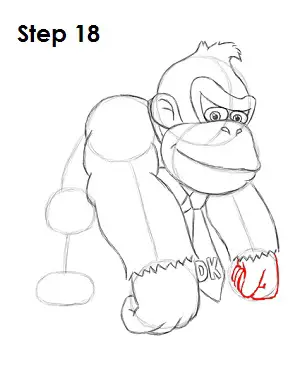
Step 18: The right hand is clenched into a fist, so it can be complicated to draw. First draw Donkey Kong's thumb as a curved line and then to the right of that draw his bent index finger. Finally, to the left of the thumb, draw three curved lines that represent Donkey Kong's folded fingers.
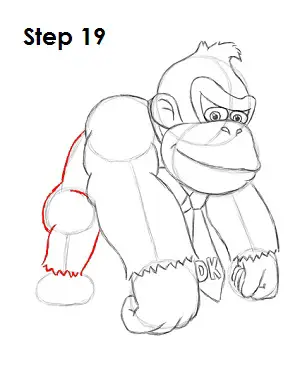
Step 19: Use the initial lines and circles as guides to draw Donkey Kong's back and leg. Curve his back and butt, widen his leg and add the zigzags at the bottom for his fur.
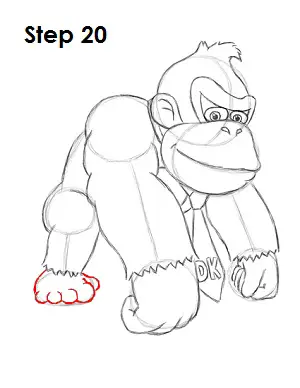
Step 20: Draw Donkey Kong's foot by drawing a series of semi-circles at the bottom of the oval that get smaller toward the left.
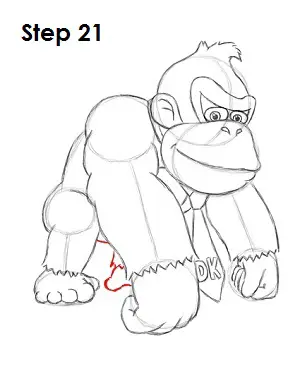
Step 21: Draw Donkey Kong's other leg in between the one you just drew and the left arm. Most of the leg is hidden by Donkey Kong's arm, but draw the visible part. Use the image above for further reference when drawing Donkey Kong.
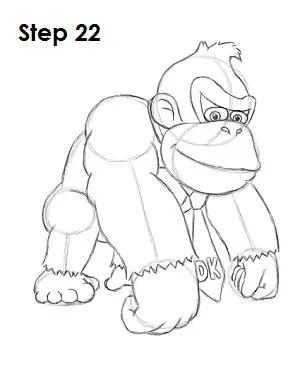
Step 22: That's it! You now have a nice sketch of Nintendo's Donkey Kong. You can stop at this quick drawing for a rough, sketchy look or go for a more finished look by continuing to the step below.
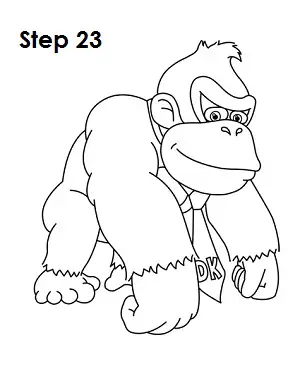
Step 23: For a more finished, inked look, carefully draw over the final sketch lines with a pen or marker. Wait for the ink to dry, and then get rid of every pencil mark with an eraser. You now have a finished inked drawing of Donkey Kong! You can stop here or go to the final step to complete your Donkey Kong drawing.
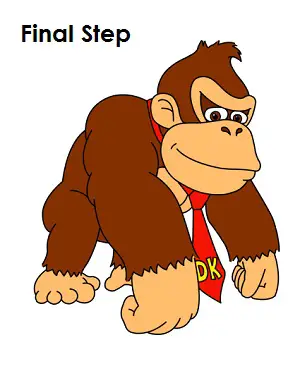
Final Step: For a completely finished Donkey Kong drawing, you have to color it. You can use markers, color pencils or even crayons! Color his fur, nostrils, eyes and the portion outside his eyes brown. The rest of him is peach. If you don't have peach, use light brown or light orange. The main color of Donkey Kong's tie is red and the letters DK are yellow. That's it! You now have a completed drawing of Nintendo's Donkey Kong.
RELATED TUTORIALS
 |
 |
 |
 |
 |


