How to Draw Anger (Inside Out)
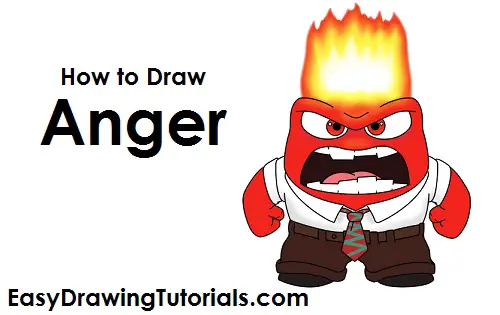
Use the video and step-by-step drawing instructions below to learn how to draw Anger from Disney•Pixar's Inside Out. A new cartoon drawing tutorial is uploaded every week, so stay tooned!
Intro: Start off with a pencil sketch. In the beginning stages, don’t press down too hard. Use light, smooth strokes for sketching.
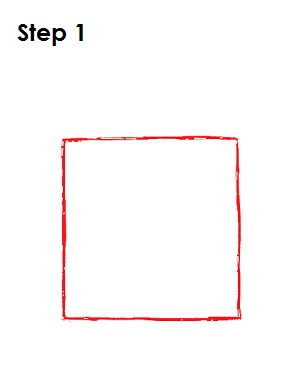
Step 1: Start by drawing a big square near the bottom of the page as a guide for Anger's body. The square doesn't have to be perfect. It's just a guide. Leave room at the top for the flames on his head.
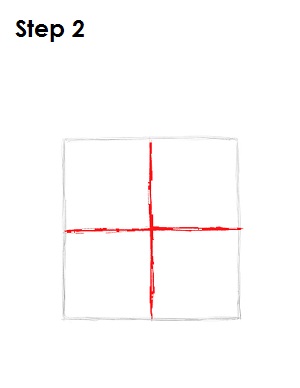
Step 2: Next, draw two intersecting lines across the square, one vertical and one horizontal. These will be construction lines that will help you place Anger's facial features later on. The lines should divide the square into four smaller squares.
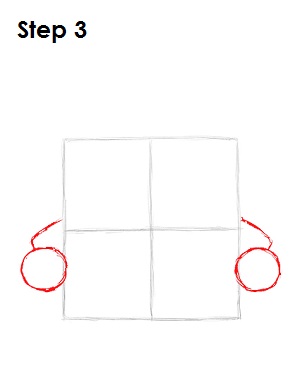
Step 3: On the sides of the square, draw two short angled lines as guides for Anger's arms. On the bottom of each line, draw a small circle as a guide for the hands.
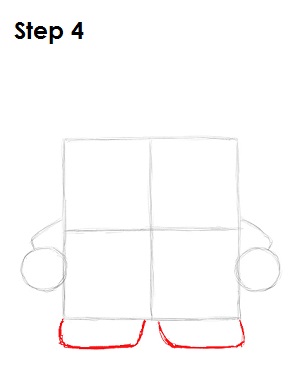
Step 4: Under the square, draw two curved lines as guides for Anger's short legs.
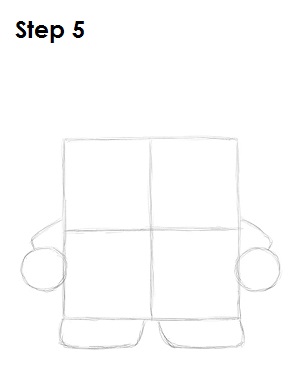
Step 5: That’s it for the initial sketch! You have the basic shape of Anger from Inside Out. Now go in and tighten your drawing. From this point on, press harder with your pencil in order to get darker lines and a more defined sketch.
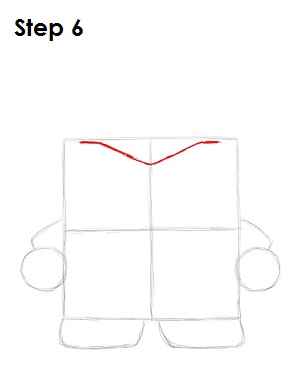
Step 6: Draw a long bent line near the top edge of the square for Anger's brow. The line is similar to a very wide letter V.
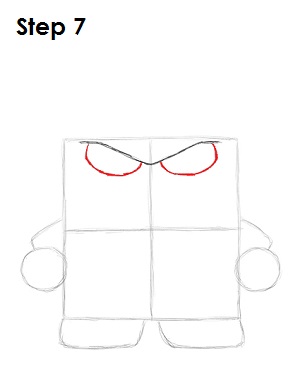
Step 7: Under the brow, draw two half-circles for Anger's eyes. Pay attention to where the eyes are in relation to the sides of the main square.
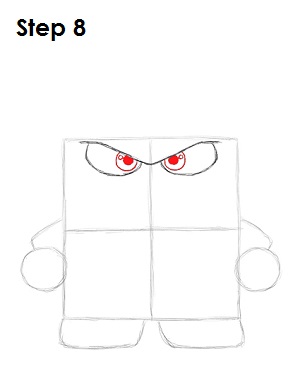
Step 8: Inside each of Anger's eyes, draw small circle for the irises. Inside each iris, draw a big dot for the pupil. On the side of each pupil, draw a tiny circle to represent glare.
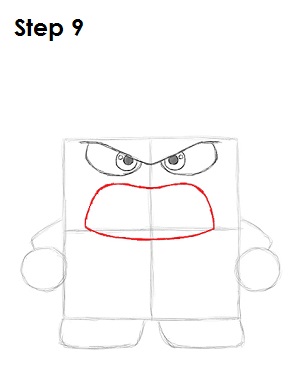
Step 9: Draw a big wide shape under Anger's eyes for the open mouth. First draw a wavy line under the eyes for the top part of the open mouth. Then add the bottom part of the mouth as a curved line that's on top of the initial horizontal construction line.
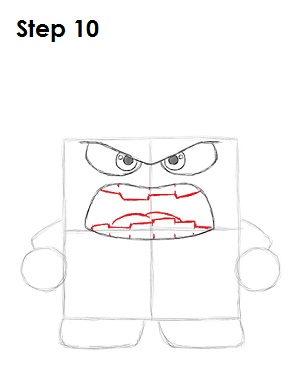
Step 10: Inside the mouth, on the top part, draw an angled line for Anger's top row of teeth. Draw a similar line at the bottom but give the line more angles to indicate more teeth. In between the teeth, draw two curved lines for the tongue.
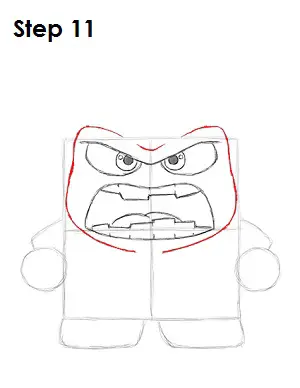
Step 11: Use the top part of the original square as a guide to draw the shape of Anger's head. The top part consists of a two angled lines to make the brow thicker. Follow the basic path of the original square to create the sides of the head but make the lines curvier as you darken them.
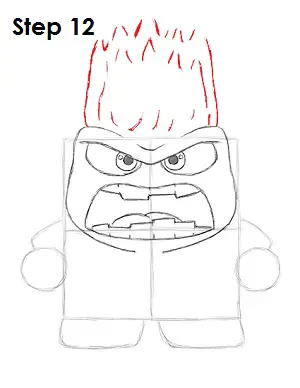
Step 12: Now draw the flames on top of Anger's head. The flames are basically a series vertical wavy lines with points at the top to indicate the tips of the flames.
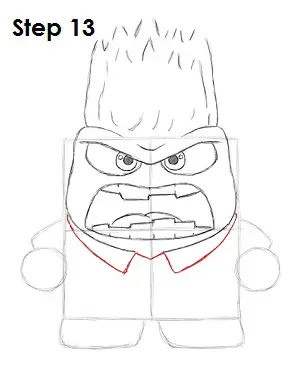
Step 13: Add Anger's shirt collar under the head. The middle part of the collar is similar to the letter M. The sides of the collar are just curved lines that connect to the head.
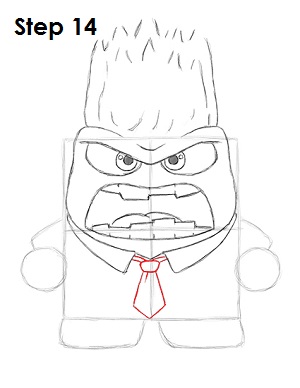
Step 14: Draw Anger's tie in the on the bottom middle part of the original square. The knot of the tie is similar to a trapezoid with rounded corners. The bottom part of the tie is similar to a diamond. The bottom tip of the tie should end at the bottom edge of the main square.
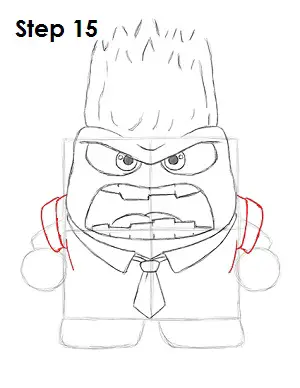
Step 15: Add Anger's shirt sleeves on the sides of the body using the initial lines as guides. Draw the shapes of the cuffed sleeves using a series of curved lines.
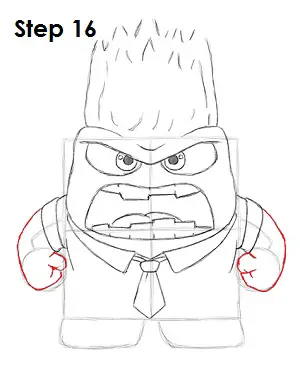
Step 16: Follow the basic path of the guides and make the shape of Anger's arms thicker. Use the circle on the ends of the lines as guides to draw the fists. The shape of the fists should fit within the shapes of the initial circles.
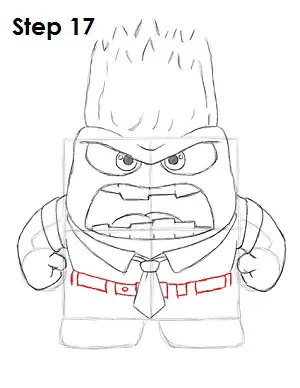
Step 17: Draw Anger's belt using a series of lines of different sizes. Use shorter lines for the belt loops and longer lines for the actual belt. The belt sits behind the tie, so make sure that the belt lines don't overlap with the tie.
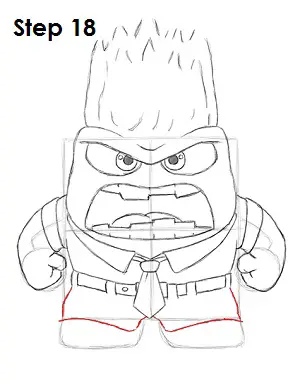
Step 18: Use the bottom part of the original square as a guide to draw Anger's pant legs. Make the sides of the the pants curvier, and the bottom should stick outside of the original square.
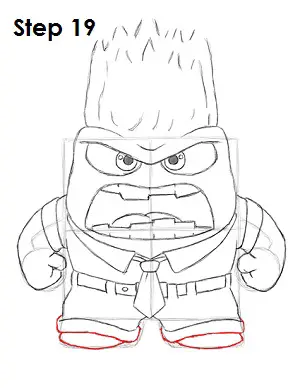
Step 19: Draw an extra curved line under the pant's legs to create a rolled up cuff. Under each cuff, draw a curved line for Anger's small shoes.
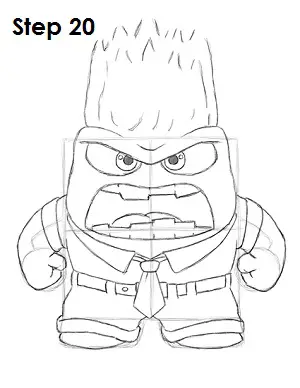
Step 20: That’s it! You now have a nice sketch of Inside Out's Anger. You can stop at this quick drawing for a rough, sketchy look or go for a more finished look by continuing to the next step.
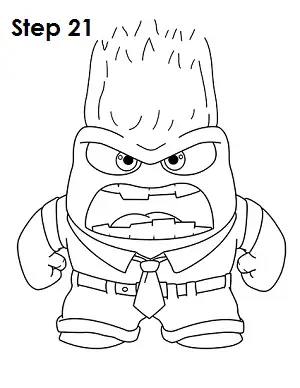
Step 21: For a more finished, inked look, carefully draw over the final sketch lines with a pen or marker. Wait for the ink to dry, and then get rid of every pencil mark with an eraser. You now have a finished inked drawing of Anger! You can stop here or go to the final step to complete your Anger drawing.
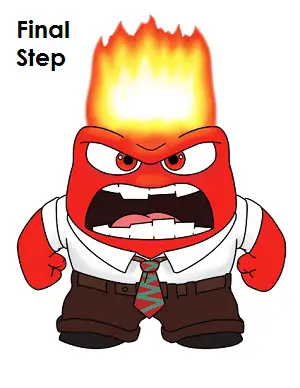
Final Step: For a completely finished Anger drawing, you have to color it. You can use markers, color pencils or even crayons! To color the flame on top of Anger's head, first use red on the outline of the shape, then orange closer to the center of the shape, then yellow and finally leave a section blank in the middle. This makes the flame appear to be glowing. The rest of Anger's body and eyes are red. The inside of his mouth and pants are brown. His tongue is pink, and his shoes are black. His tie is dark red with a blue-green zigzag. That’s it! You now have a completed drawing of Anger from Disney•Pixar's Inside Out.
Thanks for visiting! Subscribe to the EasyDrawingTutorials YouTube Channel for a new tutorial every Sunday.
To learn how to draw animals, visit How2DrawAnimals.com.
RELATED TUTORIALS
 |
 |
 |
 |


