How to Draw Deadpool
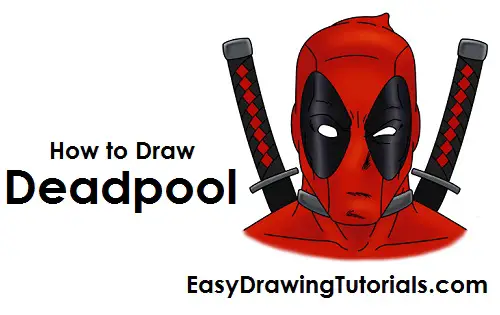
Use the video and step-by-step drawing instructions below to learn how to draw Marvel's Deadpool, aka Wade Wilson. A new cartoon drawing tutorial is uploaded every week, so stay tooned!
Intro: Start off with a pencil sketch. In the beginning stages, don’t press down too hard. Use light, smooth strokes for sketching.
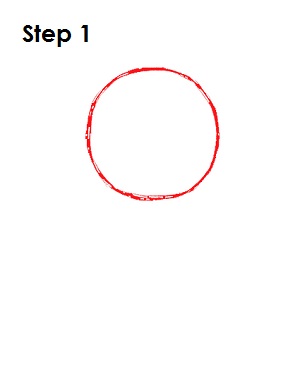
Step 1: Start by drawing a circle near the top of the page. This will be the basic shape for the top of Deadpool's head. It doesn’t have to be perfect. It’s just a guide.
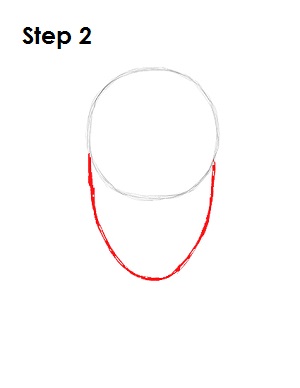
Step 2: Draw a curved U-shaped line under the circle as a guide for Deadpool's chin and jaw. From top to bottom, the arc should be almost the same as the diameter of the circle. Together these two shapes form the guide for the head.
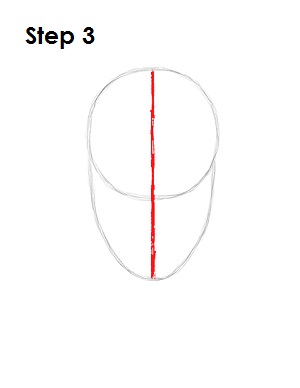
Step 3: Next, draw a vertical line that divides the head equally in two. This is a construction line that will help you place Deadpool's facial features later on.
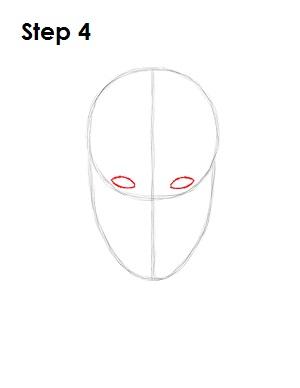
Step 4: Draw two small shapes as guides for Deadpool's eyes. Draw them sitting on top of the bottom edge of the main circle. The shapes should be similar to little footballs. Pay attention to the distance between the eyes and the vertical construction line.
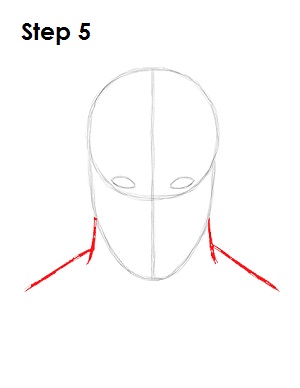
Step 5: Under Deadpool's head, draw a series of lines for the neck and top part of the shoulders.
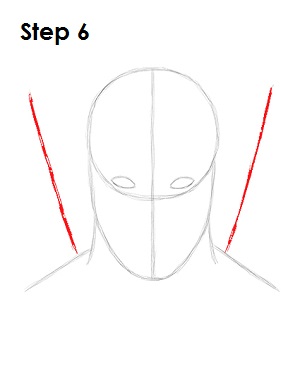
Step 6 (optional): On the top part of each shoulder, draw a long diagonal line as a guide for Deadpool's two katanas.
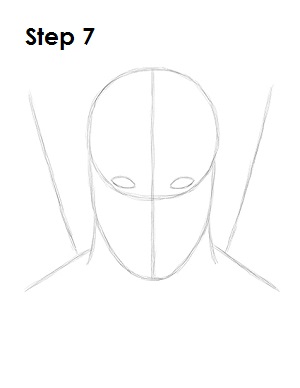
Step 7: That’s it for the initial sketch! You have the basic shape of Marvel's Deadpool. Now go in and tighten your drawing. From this point on, press harder with your pencil in order to get darker lines and a more defined sketch.
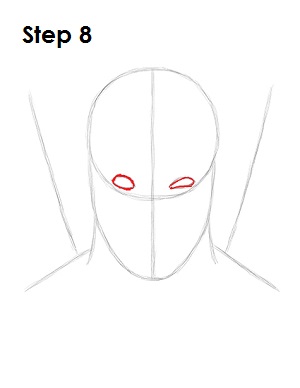
Step 8: Use the initial football-like guides to draw the shape of Deadpool's eyes. Follow the basic path of the guides but make the eye on the left wider as you darken the line and the eye on the right smaller. This gives Deadpool his classic funny, quizzical look.
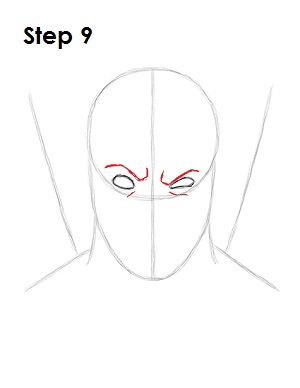
Step 9: Draw a line on top of each eye for the eyebrows. As with most comic book characters, you can still see the outline of Deadpool's brow even though he wears a mask. The line on the right should be closer to the eye than the line on the left. This will help emphasize Deadpool's perplexed look. Also add a line under each eye for extra detail.
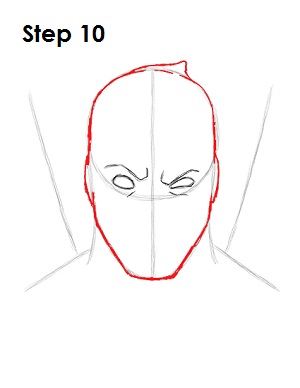
Step 10: Draw Deadpool's head using the initial shapes as guides. Follow the path of the shapes as you darken the lines. Add an extra curved line on either side of the head for the ears under the mask. You can also draw the extra part of the mask on top of the head as a curved line. Sometimes Deadpool doesn't have this -- it depends on the penciler who draws him. You can simply follow the path of the original circle if you want to omit this.
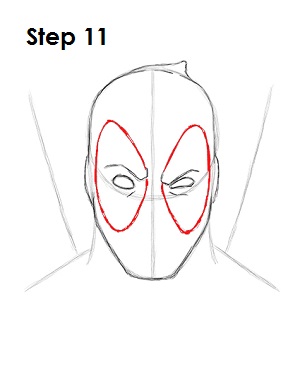
Step 11: Now draw the mask's pattern. Deadpool's mask is very simple. It consists of an oval-like shape that surrounds each eye.
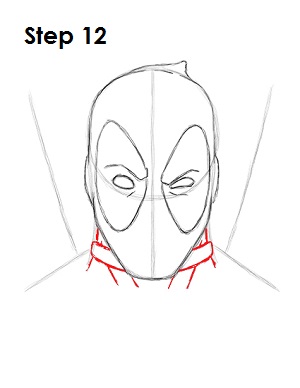
Step 12: Use the lines under Deadpool's head as guides to draw the neck. Using a series of curved lines, draw the collar around his neck. His chin should block the front part of the collar.
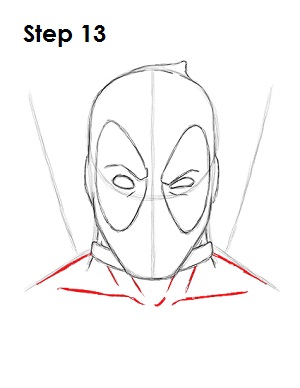
Step 13: Now darken the lines to form the top part of Deadpool's shoulders. Draw the neck muscles under the collar and the clavicle or collar bones too.
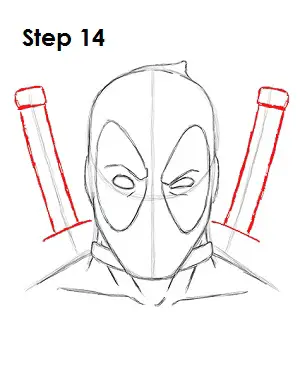
Step 14 (optional): You can skip the next two steps if you don't want to draw Wade's katanas on his back. Use the lines on the shoulders as guides to draw the handles or hilts of the katanas. Draw a small rectangle at the top of each hilt for the pommel and a line near the bottom for the top part of the guard.
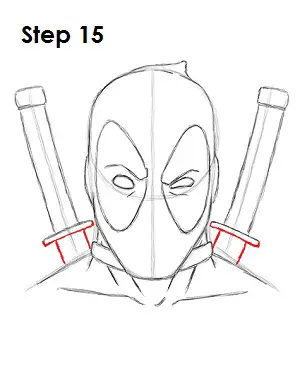
Step 15 (optional): Finish Deadpool's swords by drawing the rest of the guard as a very thin rectangle and the top part of the sheaths or scabbards as two short vertical lines.
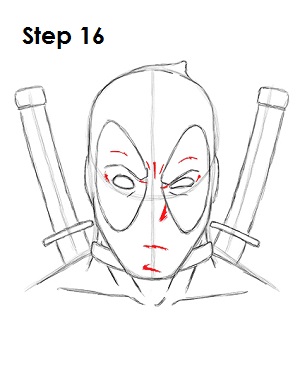
Step 16 (optional): You can stop here and continue to step 18 if you want a simpler drawing of Wade Wilson. You can draw a few lines throughout Deadpool's face to give him more detail. A few lines around his eyes accentuate his brow. Some under his eyes emphasize the shape of the nose and lips under the mask.
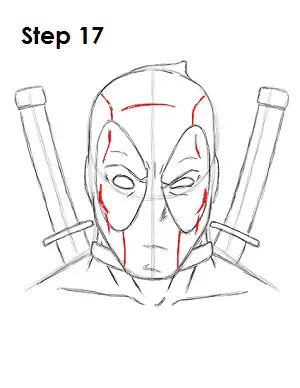
Step 17 (optional): You can add further detail if you'd like. A couple of vertical lines represent the mask's stitching. A few more lines create Deadpool's forehead and cheekbones under the mask.
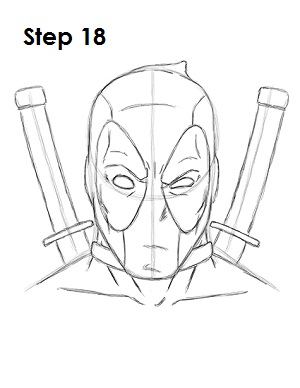
Step 18: That’s it! You now have a nice sketch of Deadpool. You can stop at this quick drawing for a rough, sketchy look or go for a more finished look by continuing to the step below.
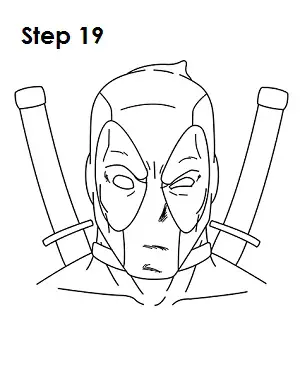
Step 19: For a more finished, inked look, carefully draw over the final sketch lines with a pen or marker. Wait for the ink to dry, and then get rid of every pencil mark with an eraser. You now have a finished inked drawing of Deadpool! You can stop here or go to the final step to complete your Deadpool drawing.
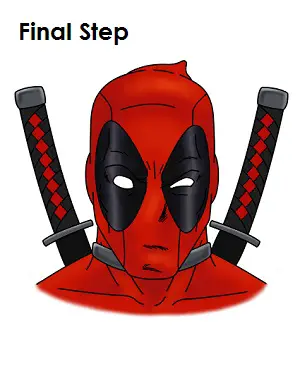
Final Step: For a completely finished Deadpool drawing, you have to color it. You can use markers, color pencils or even crayons! The pommel and guard on the katanas along with the collar around his neck are gray. The scabbards and hilts are black. You can add more detail to the hilts by adding little red diamonds across the middle to represent the wrappings. The main part of Deadpool's costume is red. The ovals around his eyes are black. If you'd like, you can leave a strip down the middle of each oval blank to represent shine. That’s it! You now have a completed drawing of the merc with a mouth, Deadpool, aka Wade Wilson, from Marvel.


