How to Draw Waluigi

Use the video and step-by-step drawing instructions below to learn how to draw Waluigi from Nintendo's Super Mario Brothers video games. A new cartoon drawing tutorial is uploaded every week, so stay tooned!
Intro: Start drawing Waluigi with a pencil sketch. In the beginning stages, don't press down too hard. Use light, smooth strokes for sketching.
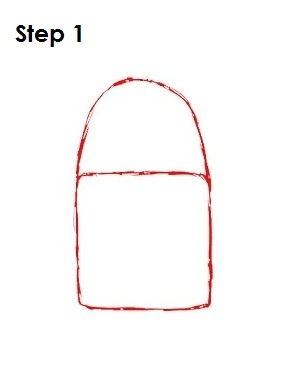
Step 1: To draw Waluigi, tart with a big rounded square, meaning the square's corners are rounded a bit instead of being angles. Add a big curve on top of this shape so it looks kind of like a bag. This will be the basic shape for Waluigi's head.
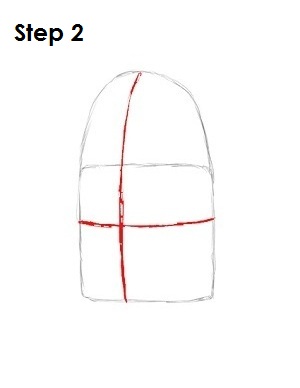
Step 2: Inside the shapes, draw two intersecting lines, one vertical and one horizontal. Draw the vertical line a bit closer to the left edge of the head shape, while the horizontal line should be somewhere near the middle of the original square. These will be construction lines that will help you place Waluigi's features later on.
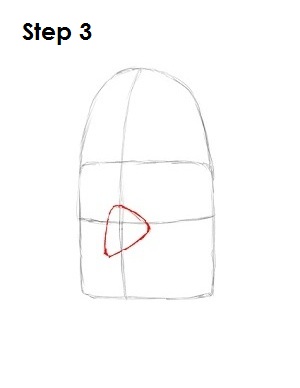
Step 3: Slightly below where the two construction lines meet, draw a triangle shape that kind of looks like a slice of pizza. This is the basic shape for Waluigi's nose.
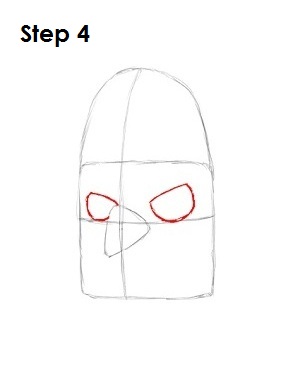
Step 4: Draw Waluigi's eyes, which sit on top of the horizontal construction line. They're basically half circles that are tilted. Draw the left eye smaller because of the perspective and because it's hidden behind Waluigi's nose.
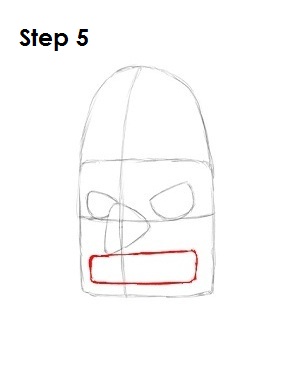
Step 5: Draw Waluigi's sinister smile by drawing a long, narrow rectangle right underneath his nose.
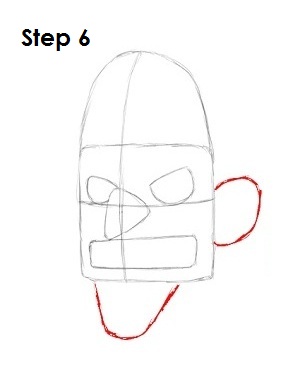
Step 6: Draw Waluigi's big ear by drawing a curve that looks like a backwards letter C on the right side of his face. Underneath the original square shape, draw a curved line that's similar to a letter U for this video game character's pointy chin.
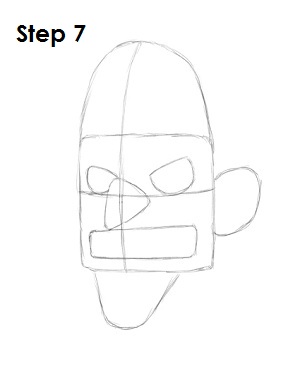
Step 7: That's it for the initial sketch of Waluigi from Nintendo's Mario Brothers video games! You have the basic Waluigi shape, so now go in and tighten your drawing. From this point on, press harder with your pencil in order to get darker lines and a more defined sketch.
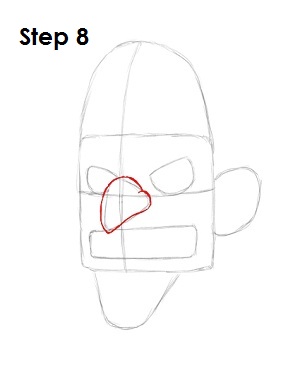
Step 8: Using the original shape as a guide, darken in Waluigi's nose and make it rounder and curvier.
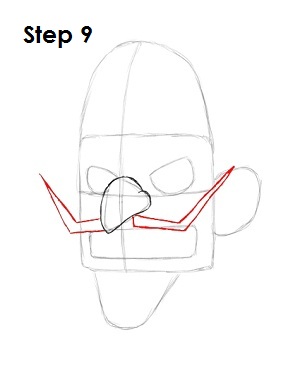
Step 9: Now draw Waluigi's thin, evil moustache. Draw a thick line that angles up; it kind of resembles the letter L. Draw the right side of his moustache smaller because of the perspective.
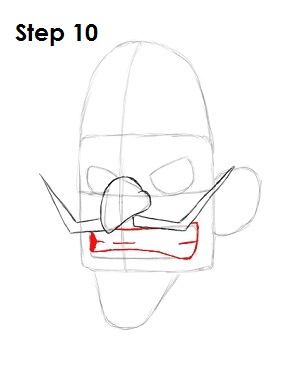
Step 10: Darken in the shape of Waluigi's mouth and make the bottom curve down slightly. Shade in the left side of his mouth to represent the inside of it. Inside his smile, draw three horizontal lines to indicate the section where Waluigi's teeth come together.
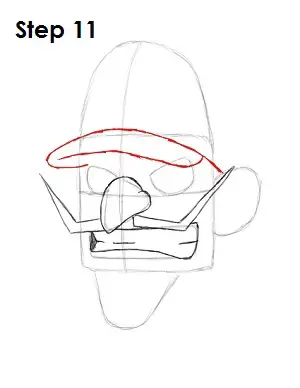
Step 11: For Waluigi's hat, draw a line that goes from the right side of his face, above the left eye. Make this line go to the left a bit, and make it curve up toward the top of the main square shape, and then bring it back down, ending on top of the ear. Draw the “bill” of the cap as a line that comes into the right eye and goes to the left.
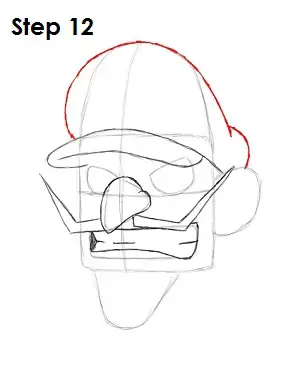
Step 12: To draw the top part of Waluigi's hat, use the top curve of the first main shape as a guide, but make it wider and draw an extra curve on the right side the ends on top of his ear. This will represent the back of Waluigi's hat.
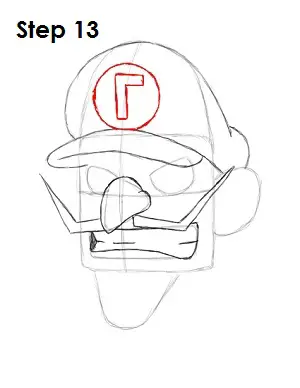
Step 13: Finally draw a big backward, upside-down letter L in front of it above Waluigi's bill of the hat and draw a circle around it.
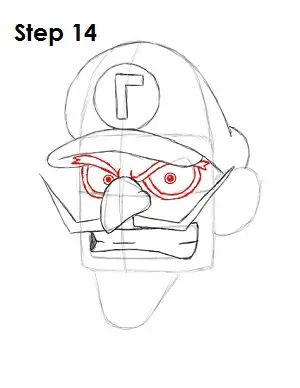
Step 14: Darken in the shape of Waluigi's eyes and draw a curved line on top of each that hide behind the bill of his hat for his eyebrows. Draw an extra line around his eyes to give him that crazed look. Draw his eyes as three tiny circles inside each other that represent his iris, pupil and glare.
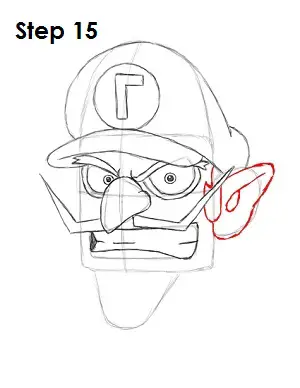
Step 15: Now draw in Waluigi's left sideburn, which sits below his cap and behind his moustache. It's round at the bottom and has a tiny point where it curls up. When drawing his ear, give it more shape and make it pointy on top. Draw some lines within it to indicate the inside of this video game character's ear.
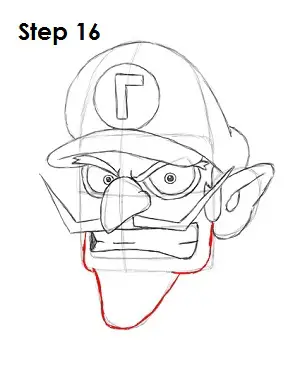
Step 16: Draw Waluigi's face by drawing his jaw and pointy chin. Just darken in the main shape and make it more round and wrap it around that smile of his.
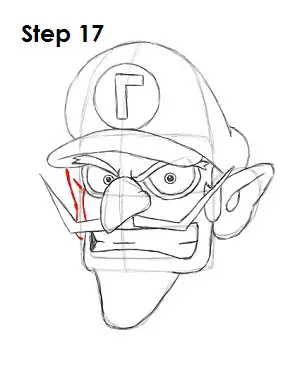
Step 17: Finish up Waluigi by drawing in the portion of the right ear that is visible to us along with the left side of his face.
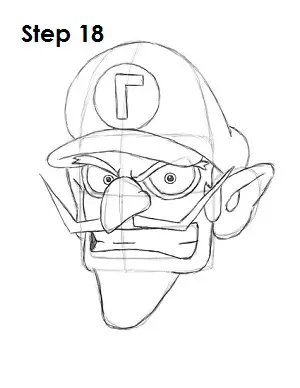
Step 18: That's it! You now have a nice sketch of Waluigi from Nintendo's Mario Brothers video games. You can stop at this quick drawing for a rough, sketchy look or go for a more finished look by continuing to the step below.
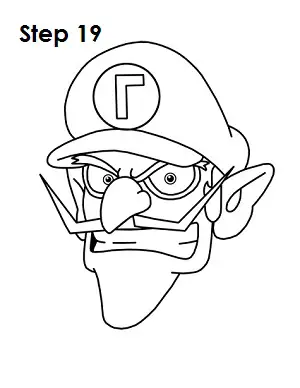
Step 19: For a more finished, inked look, carefully go over the final sketch lines with a pen or marker. Wait for the ink to dry and then get rid of every pencil mark with an eraser. You now have a finished inked drawing of Waluigi! You can stop here or go to the final step to complete your Waluigi drawing.
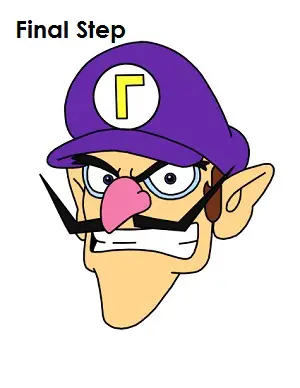
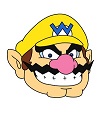
Final Step: For a completely finished Waluigi drawing, you have to color it. You can use markers, color pencils or even crayons! Color Waluigi's cap purple along with his eyes. The L on the hat is yellow. Waluigi's hair is brown, while his eyebrows and moustache are black. His big nose is pink, and the area on the sides of his eyes is light blue. His skin is a peach color like the Princess! If you don't have peach, then improvise! Use light orange or pink, or anything that looks good. Experiment! That's it! You now have a completed drawing of Waluigi.
RELATED TUTORIALS
 |
 |
 |
 |
 |


